~
that I push to GitHub. I’ve used this system for 6 years and like it a lot. See below to set it up for yourself!
The core functionality comes from 3 lines in my ~/.bashrc
:
homegit() {
git --git-dir=$HOME/.homegit --work-tree=$HOME "$@"
}
This defines a command homegit
that works like regular git
except that it saves its state in ~/.homegit
(as opposed to ~/.git
). Having a special command helps avoid accidents, like thinking I’m in a project repo, running git clean -dfx
, and deleting everything in my home. I also use git_prompt_info
in my Zsh PS1
to show my current Git branch, and by using --git-dir=$HOME/.homegit
I avoid seeing branch information all the time.
I also define this command:
homegit-private() {
git --git-dir=$HOME/.homegit-private --work-tree=$HOME "$@"
}
homegit-private
works just like homegit
, with the same Git toplevel dir (!) The difference is that I push the contents to a private repo. This allows me to version things like my SSH config and easily keep it in sync across devices. It’s also where I put anything that isn’t the same between my home and work setups.
When I want to pull my dotfiles onto a new device, I run these commands:
git clone git@github.com:kerrickstaley/homedir
mv homedir/.git ~/.homegit
git --git-dir=$HOME/.homegit diff # check that the next command won't overwrite anything
git --git-dir=$HOME/.homegit reset --hard HEAD
The last piece that helps with all this is the runningon
command. This allows me to put conditional blocks in my rc files like this:
# Default to Gnu binaries on macOS.
if runningon macos; then
export PATH="/opt/homebrew/opt/coreutils/libexec/gnubin:$PATH" # coreutils
export PATH="/opt/homebrew/opt/grep/libexec/gnubin:$PATH" # grep
export PATH="/opt/homebrew/opt/gnu-sed/libexec/gnubin:$PATH" # sed
export PATH="/opt/homebrew/opt/gnu-tar/libexec/gnubin:$PATH" # tar
fi
That way, I can use the same rc files on both macOS and Linux, at both home and work.
If you want to use this system yourself, you just need to copy these 7 lines into your .bashrc
or .zshrc
, and copy the runningon
script into your ~/bin
and modify the list of hostnames.
The vcs-home wiki page links to many other approaches to this idea.
To avoid messy git status
output, I’ve run
homegit config status.showUntrackedFiles no
on all my machines as suggested in this HN post.
]]>I enjoy micro-optimizing things, so I have a device that tells me when to leave my apartment to catch the train. At 10:53 AM, it told me to leave, so I did; it was lining me up for a train scheduled to depart at 11:01 AM. The station is 10 minutes away walking but the transit panel thought the train was running 2 minutes late.
At the station I waited about 2 minutes for the train to appear and another 2 for it to leave once I boarded. 4 minutes 1 of precious time which could have been spent blogging was instead wasted waiting in the near-freezing station. What happened—why did my transit panel mislead me so?
A system’s output is only as good as the input you feed to it, and it turns out the transit panel was itself misled by the API it was using to get realtime PATH departures. That API had an overly-optimistic view of how late the train was running. Let’s look at the data!
Here’s a graph of how many minutes were left before the train departed according to 4 sources, in the 10-odd minutes leading up to departure:
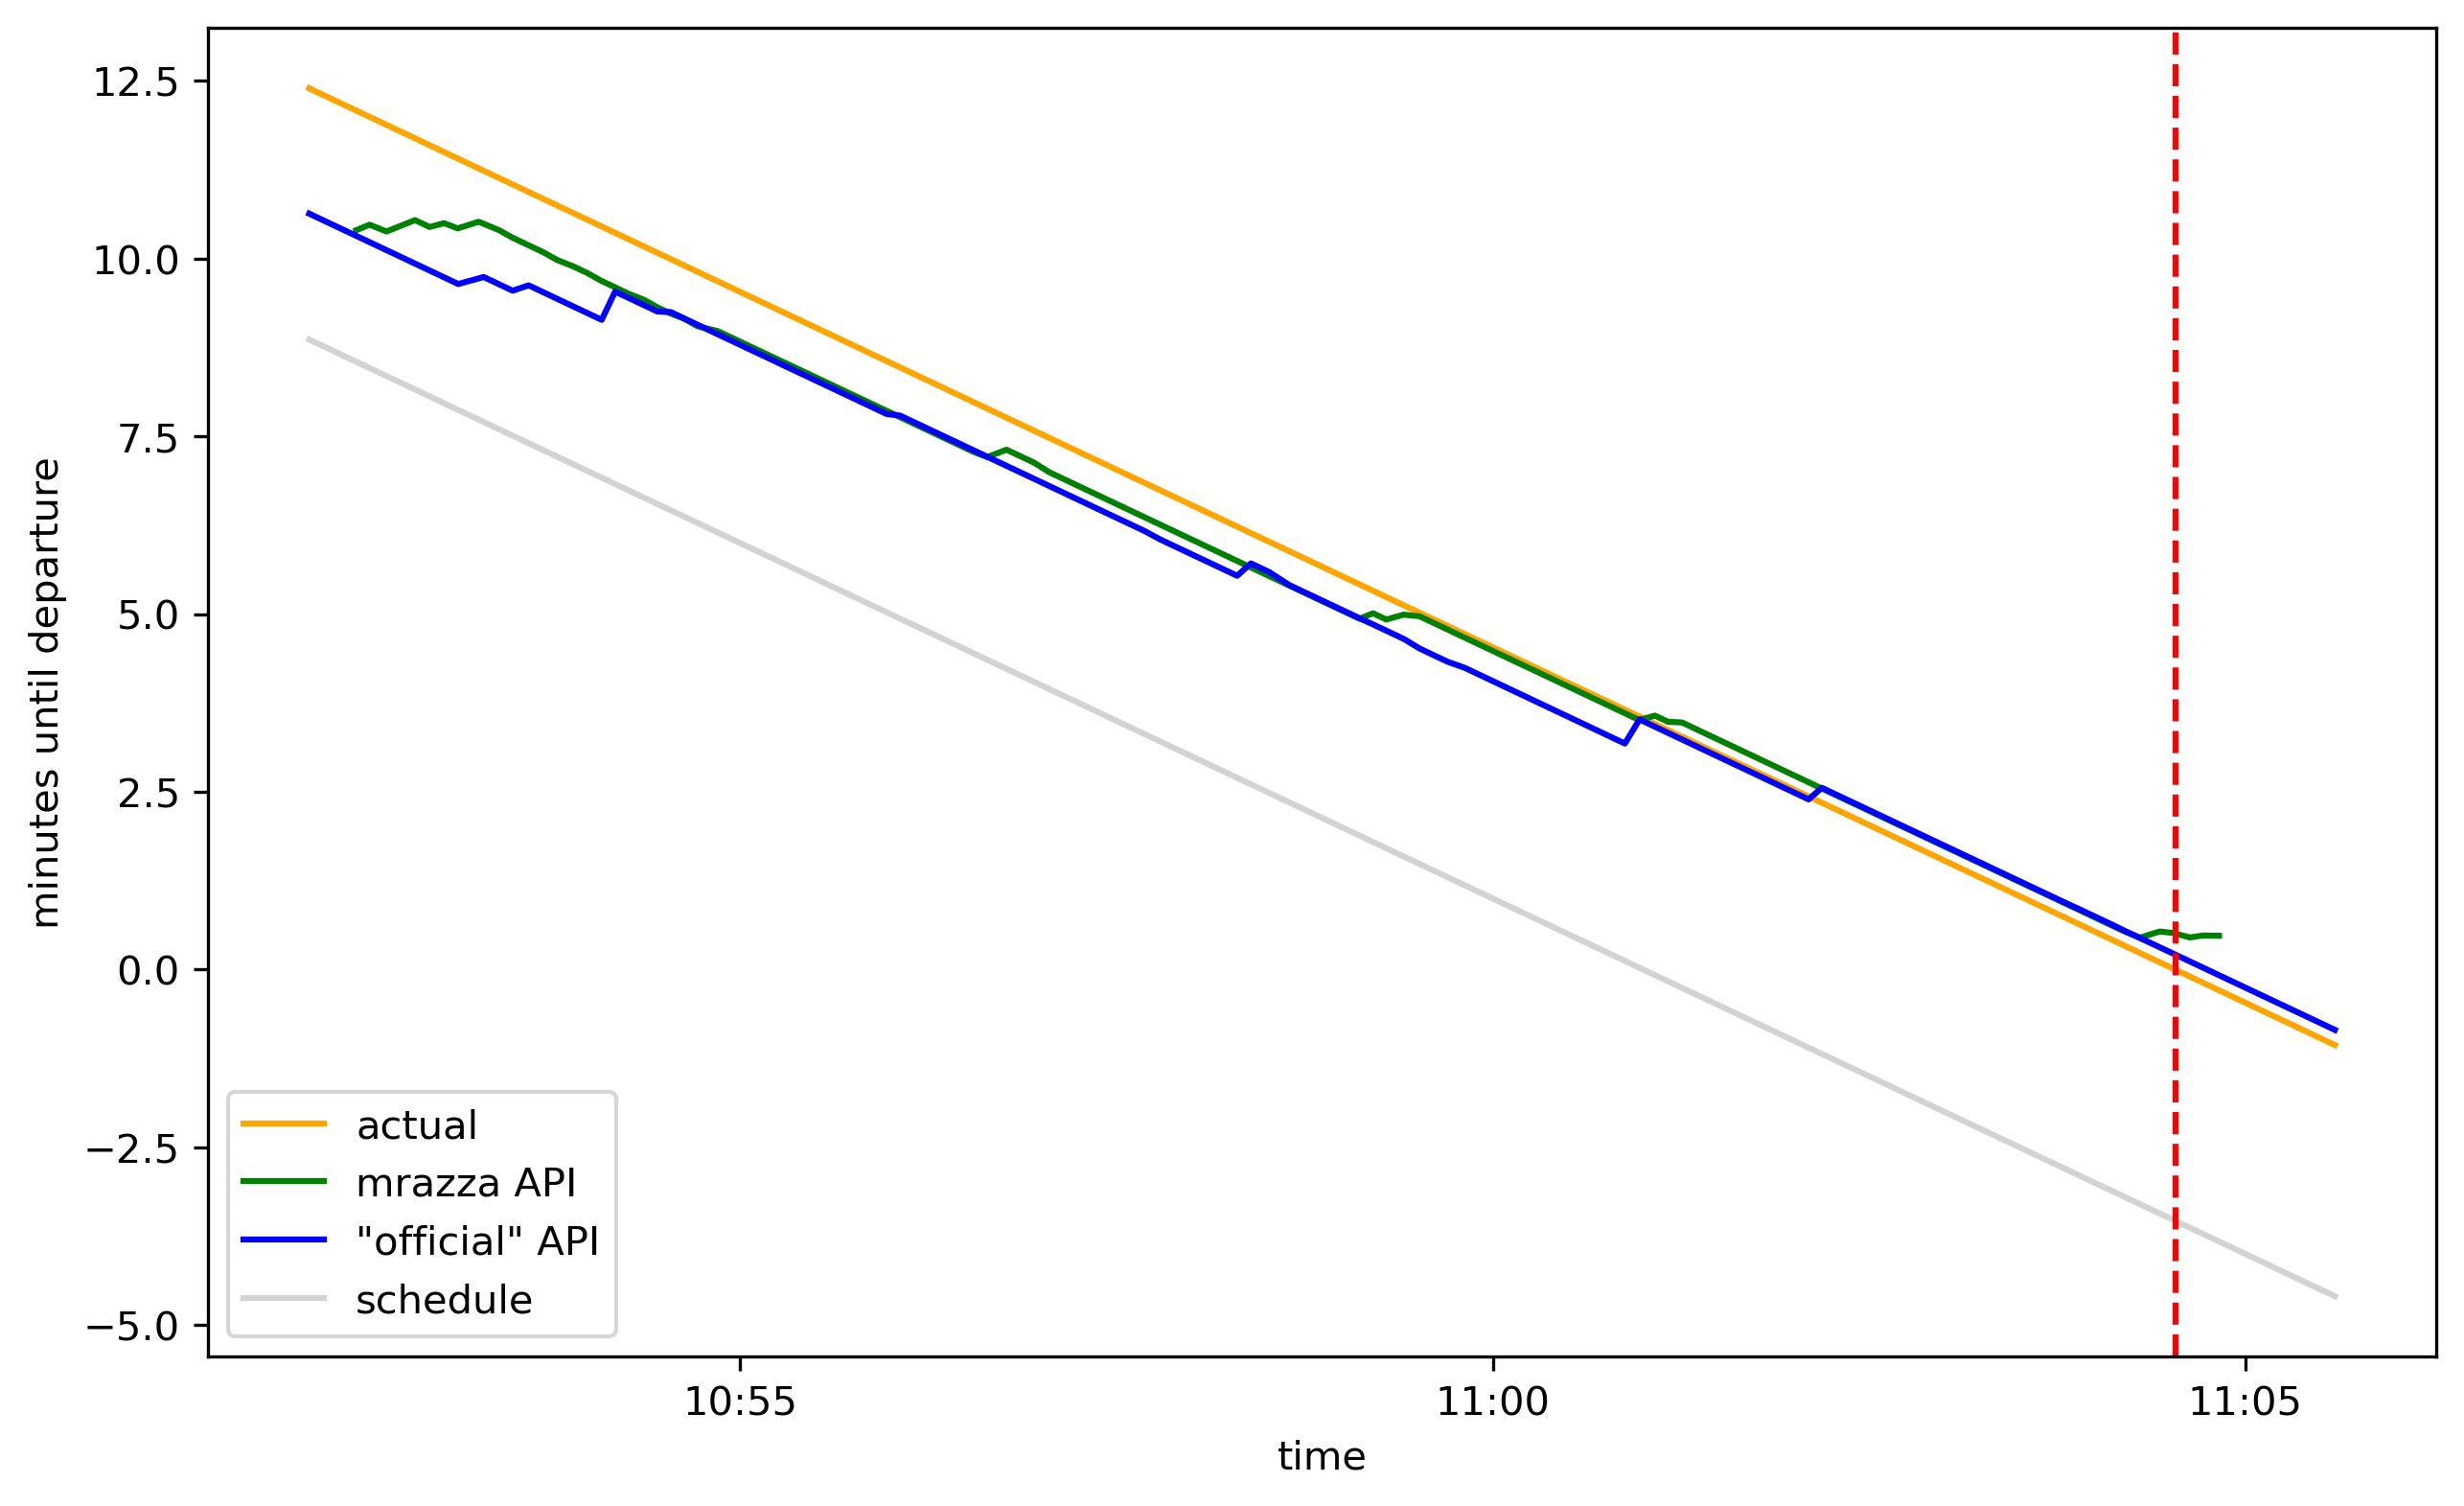
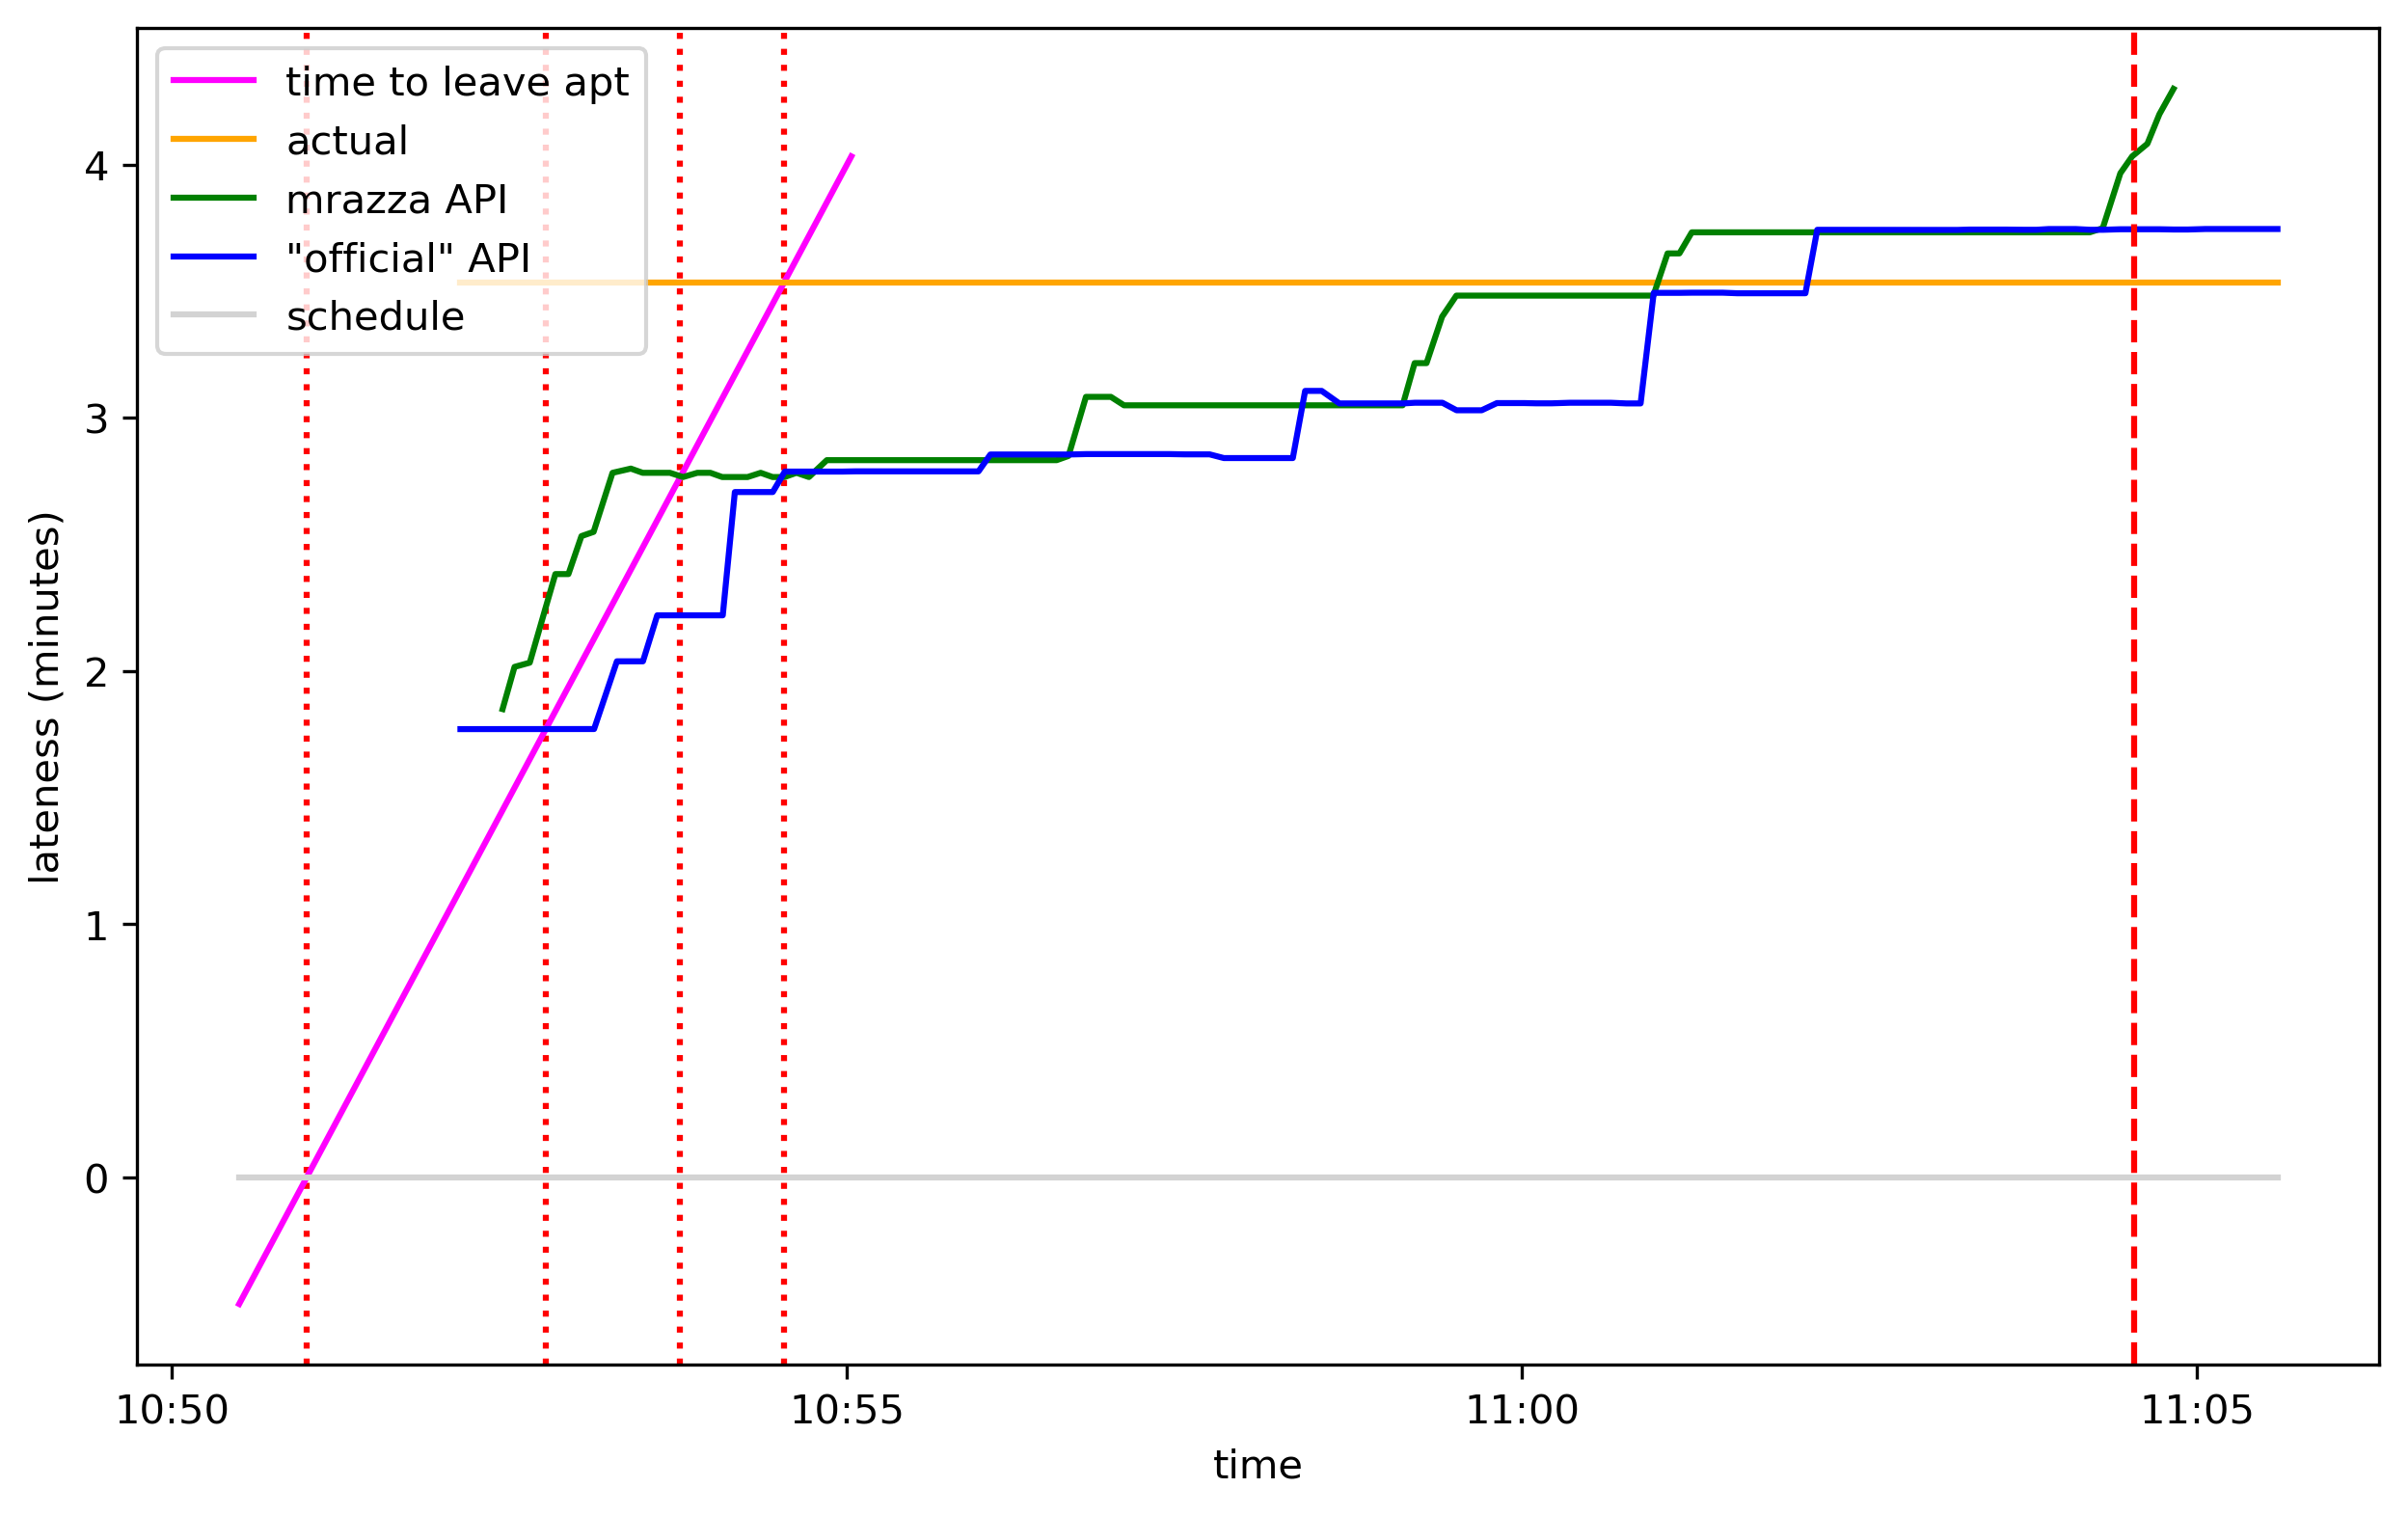
The gray line is how much time was left until departure according to the train schedule. By “departure” I mean when the doors closed. The green line uses data from an API made by Matt Razza.2 The blue line uses data from an “official” API.3 The orange line is the actual time left (as if we had a crystal ball which knew the exact departure time). The dashed red line is the departure.
This graph is easier to interpret if you instead look at how late the sources predict the train will be:
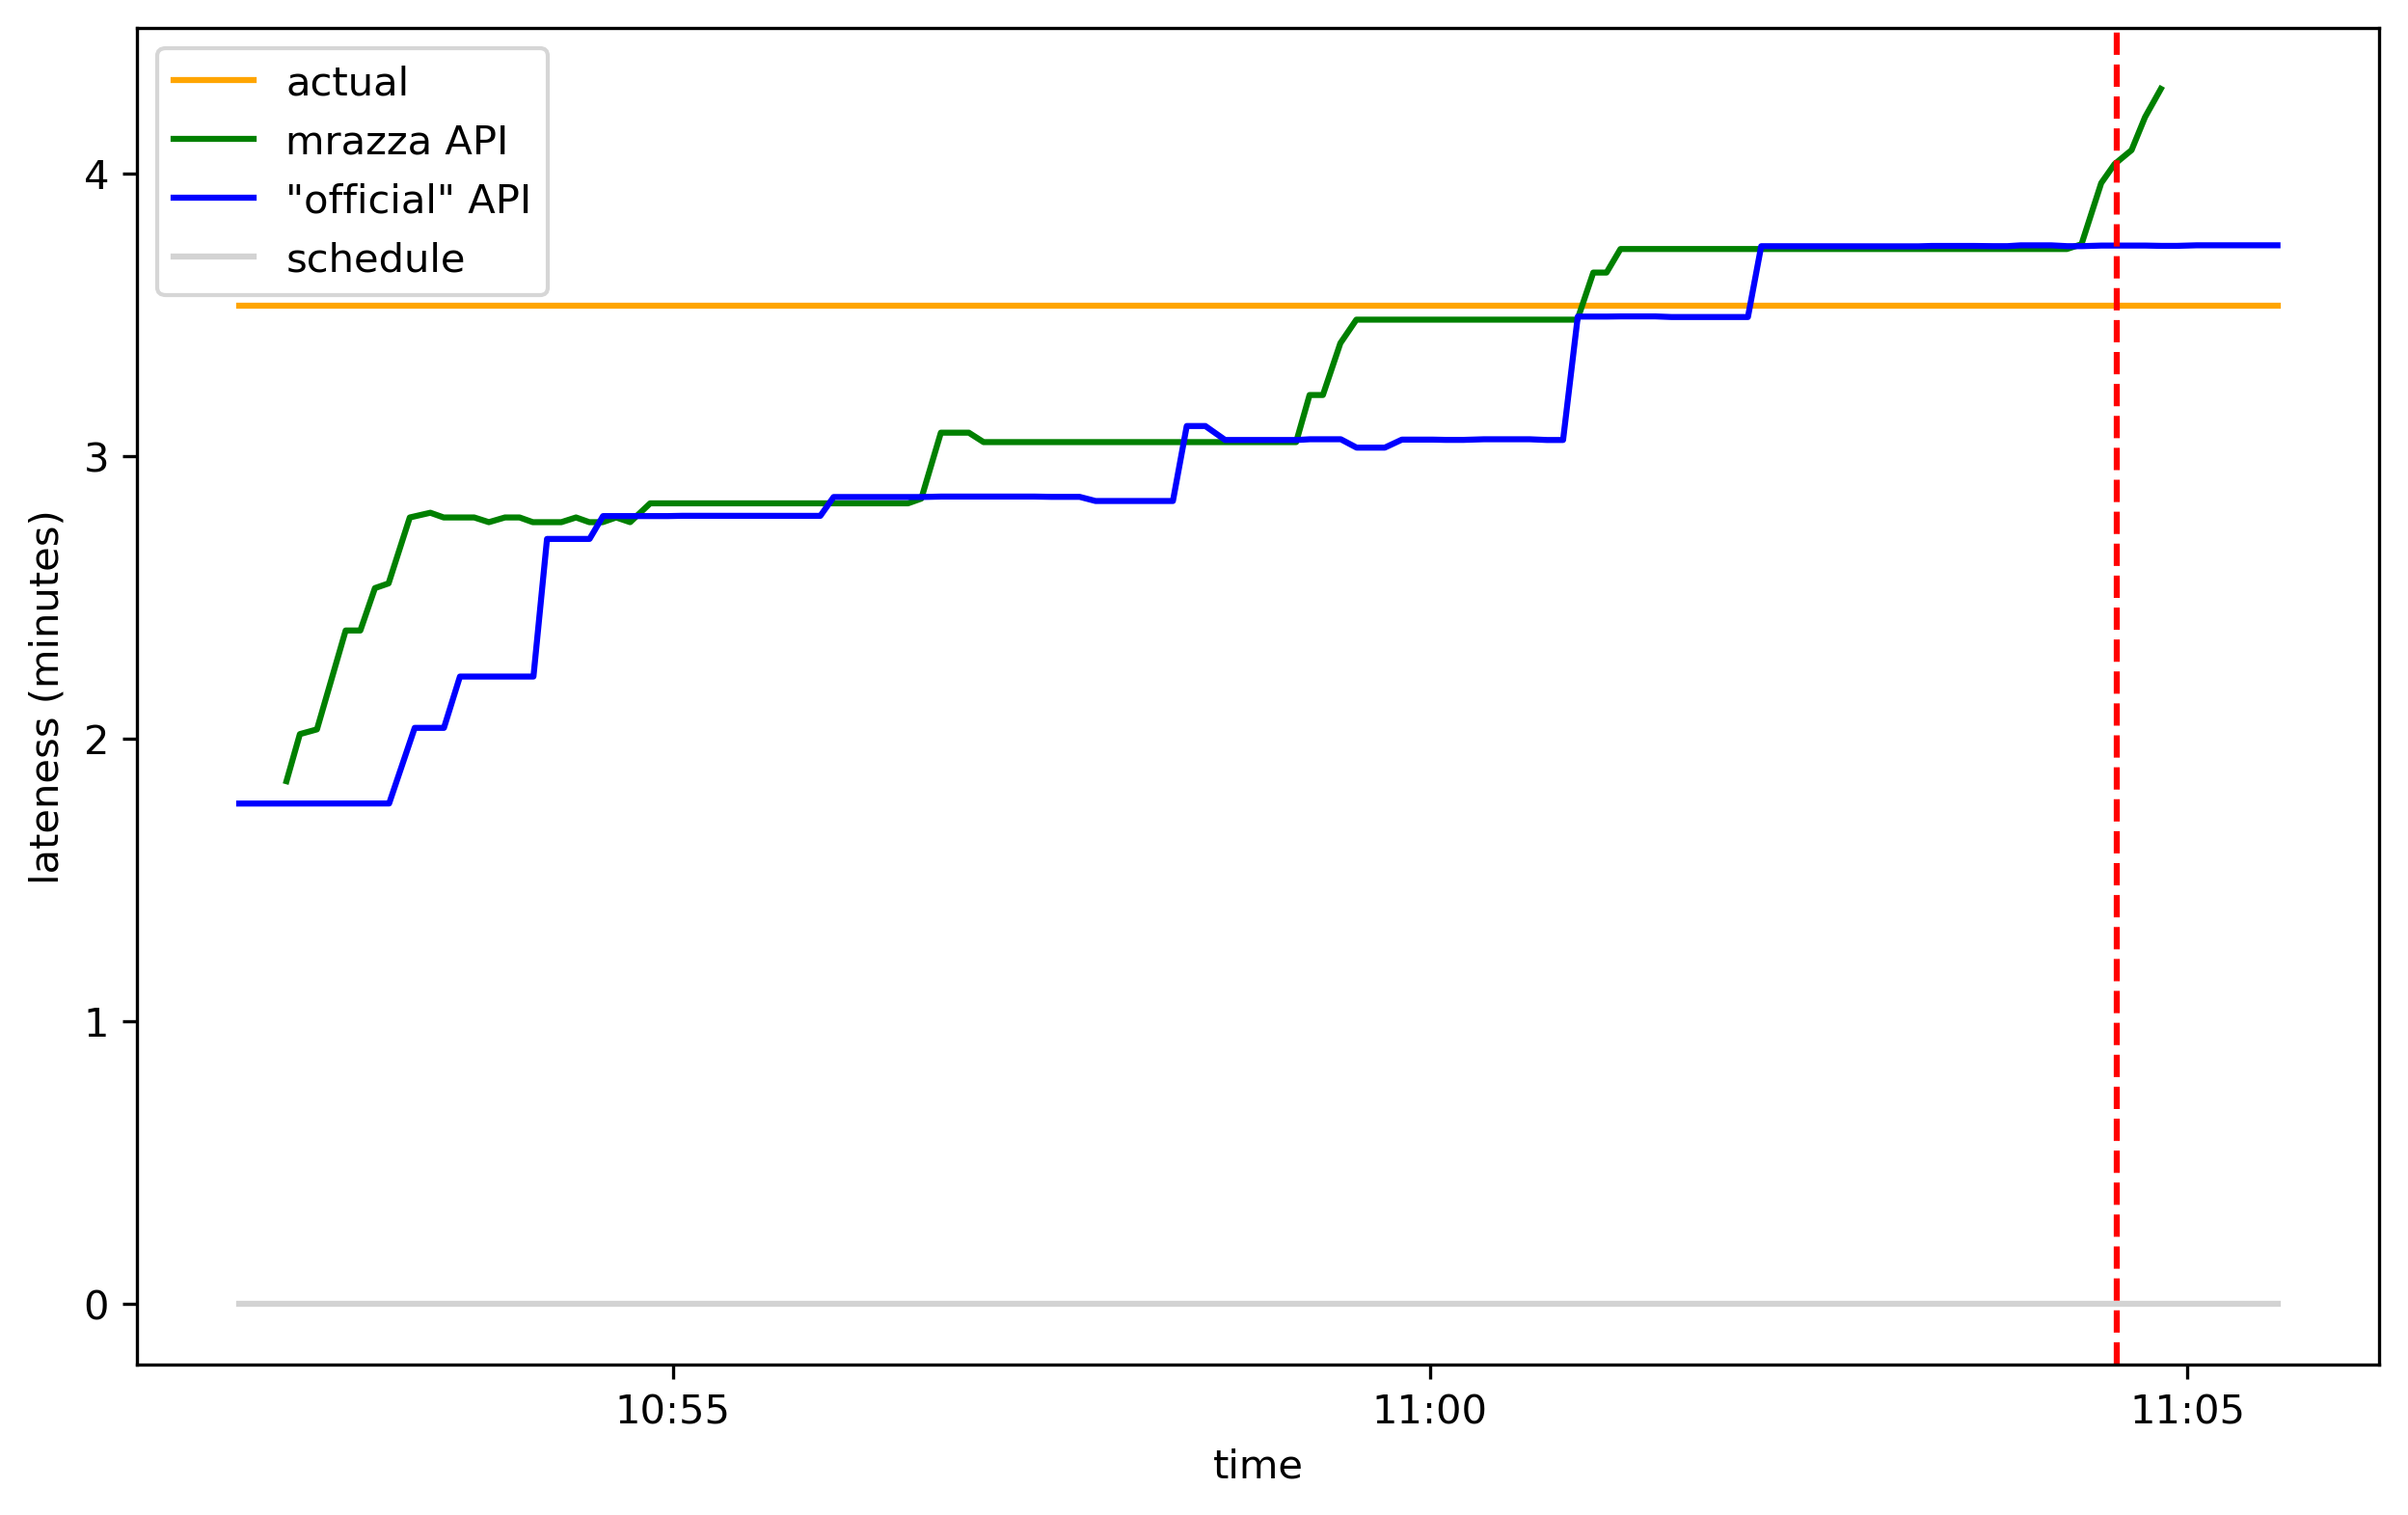
The train was ultimately 3m32s late, but intially the two APIs estimated it at 1m48s late. As the actual departure time drew closer, the APIs became more accurate and eventually overshot, predicting it would leave 13 seconds after it did.4
To catch the train I needed to leave 10 minutes before departure. Here’s what that looks like superimposed on the first graph:
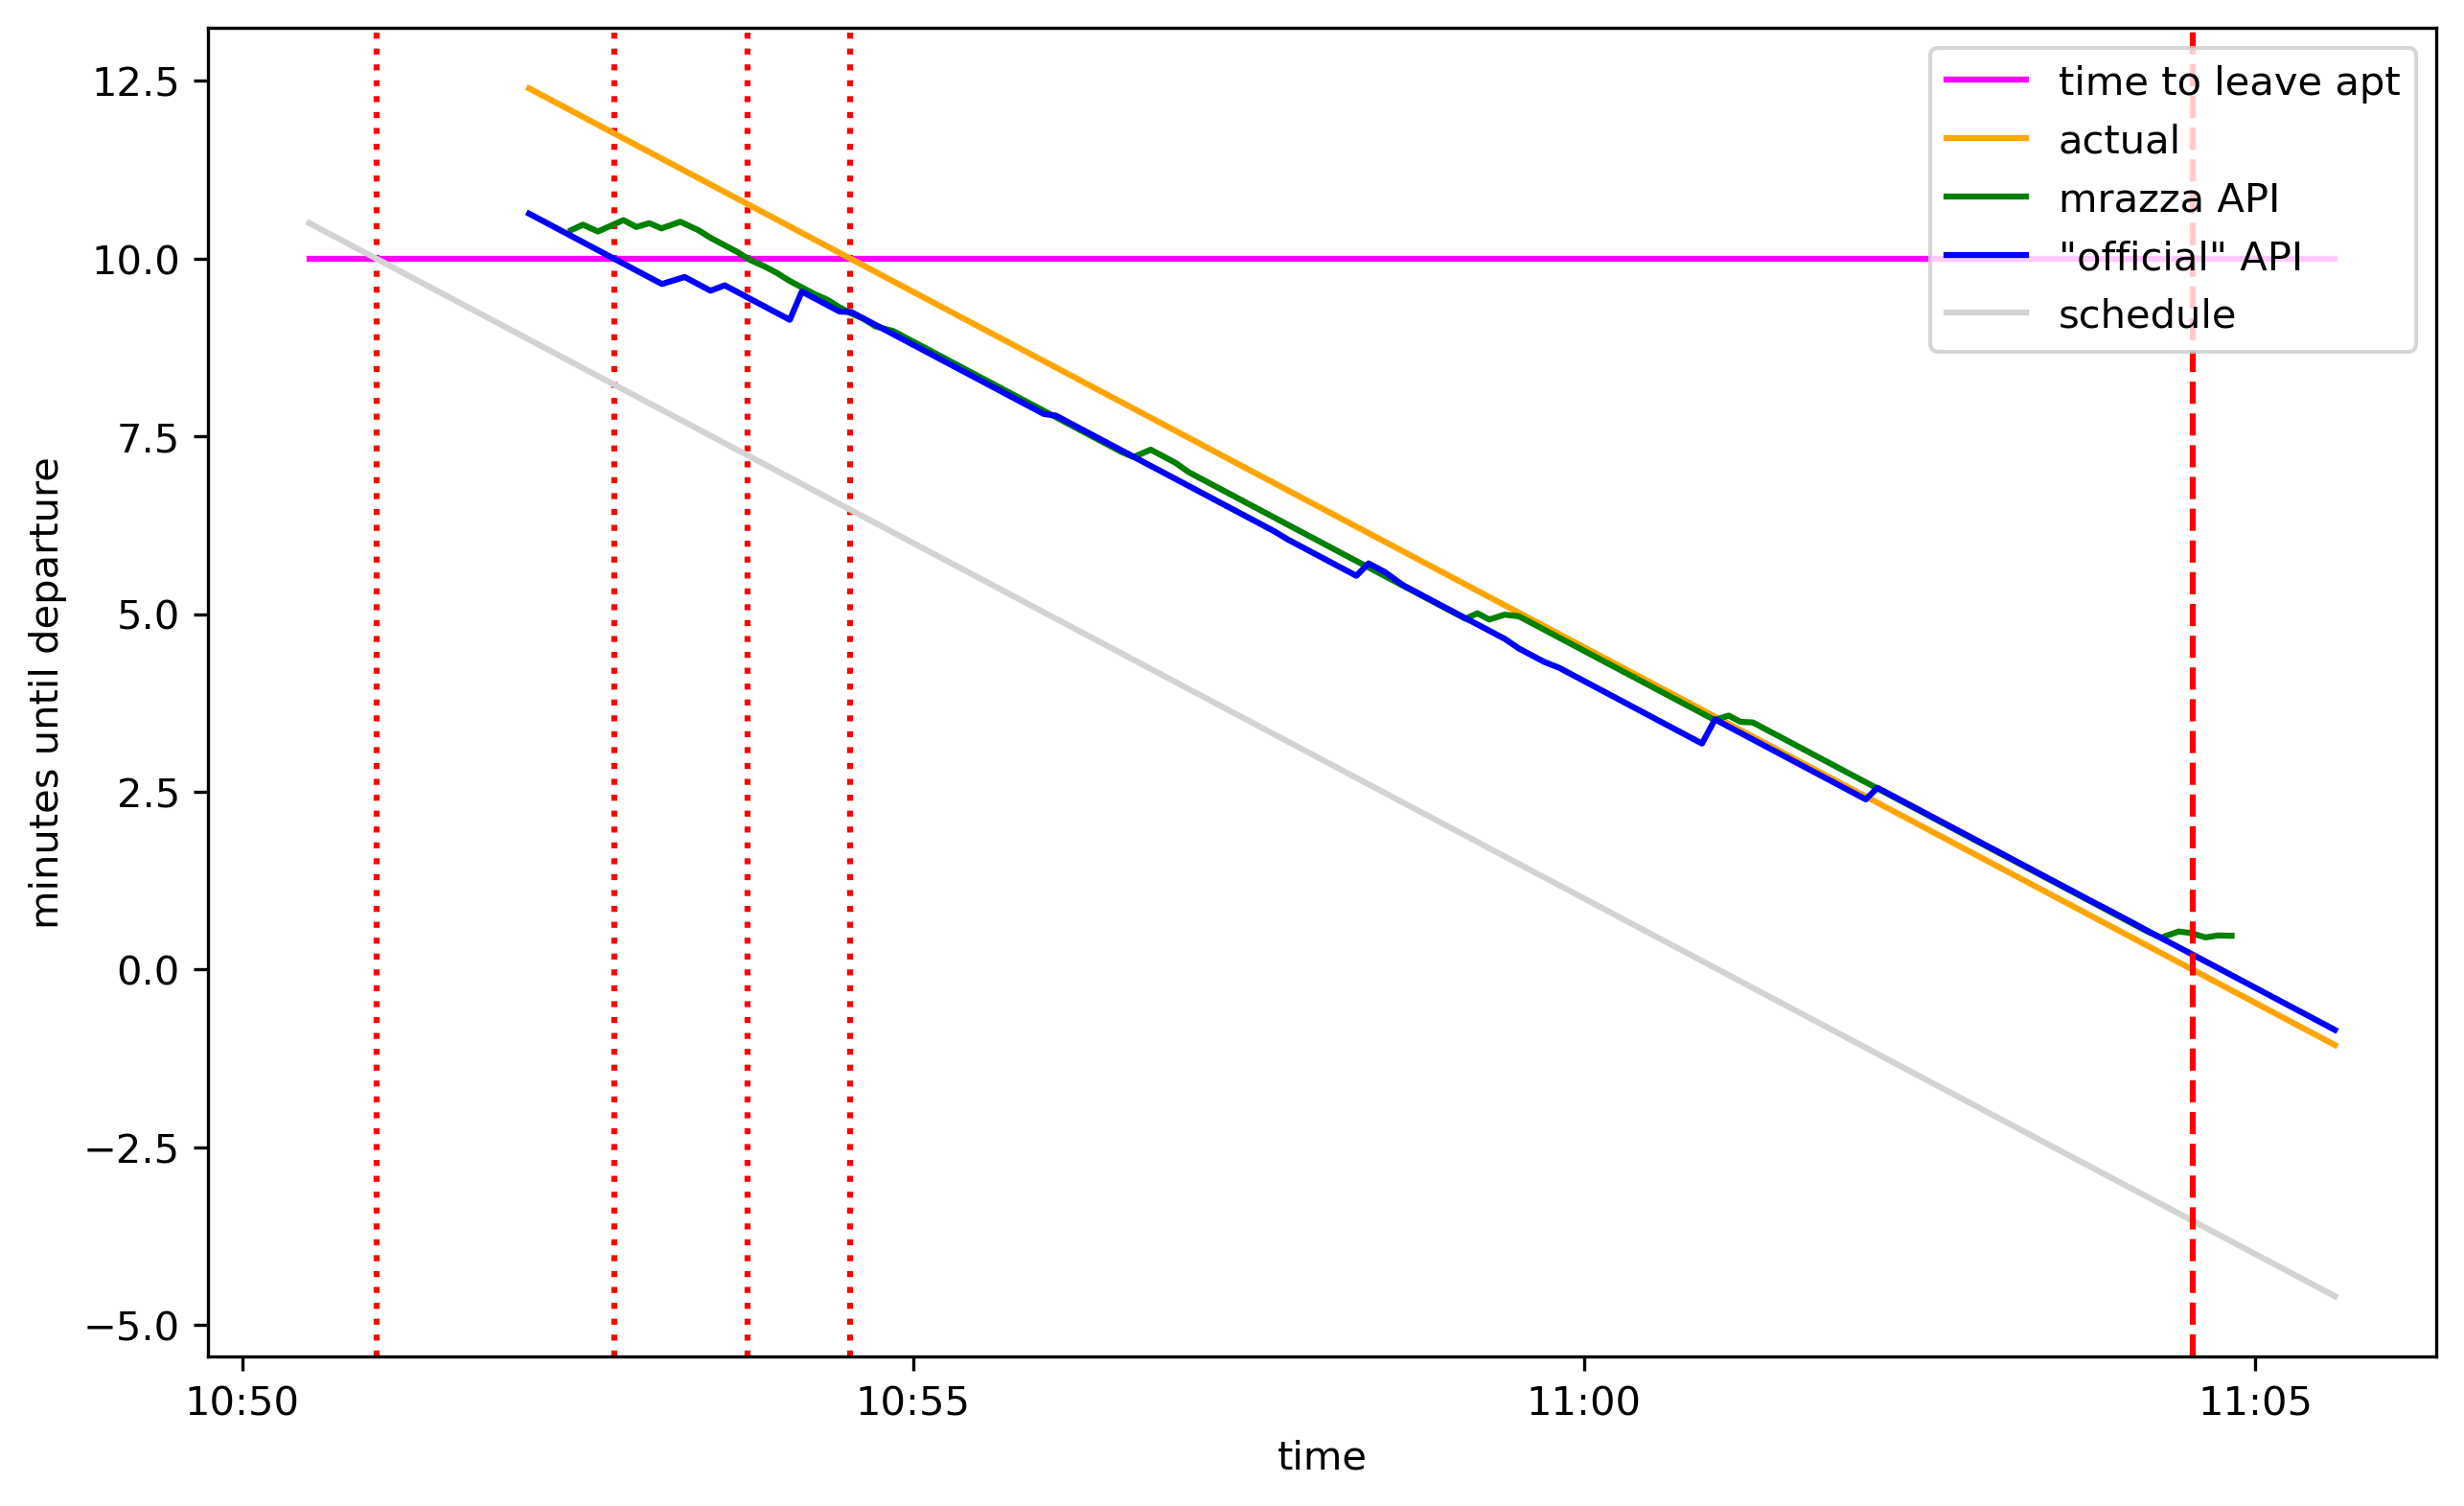
The intersections of the magenta line with the 4 timelines are the times I should leave my apartment according to these 4 sources:
source | when to leave according to source |
---|---|
schedule | 10:51:00 |
"official" API | 10:52:46 |
mrazza API | 10:53:46 |
ground truth | 10:54:32 |
Following the schedule, I would have left 3m32s too early. Since my transit panel uses the “official” API, I was able to save half of that. If mrazza’s API—which gives better data (see below) but is down—were available, I could have saved another minute. And if the API made perfect predictions, it would have saved the remaining 46 seconds.
Squinting at that second graph, the “official” API looks an awful lot like a lagged version of Matt Razza’s API. Indeed, if we scoot it ahead 80 seconds, we see that it aligns pretty well:
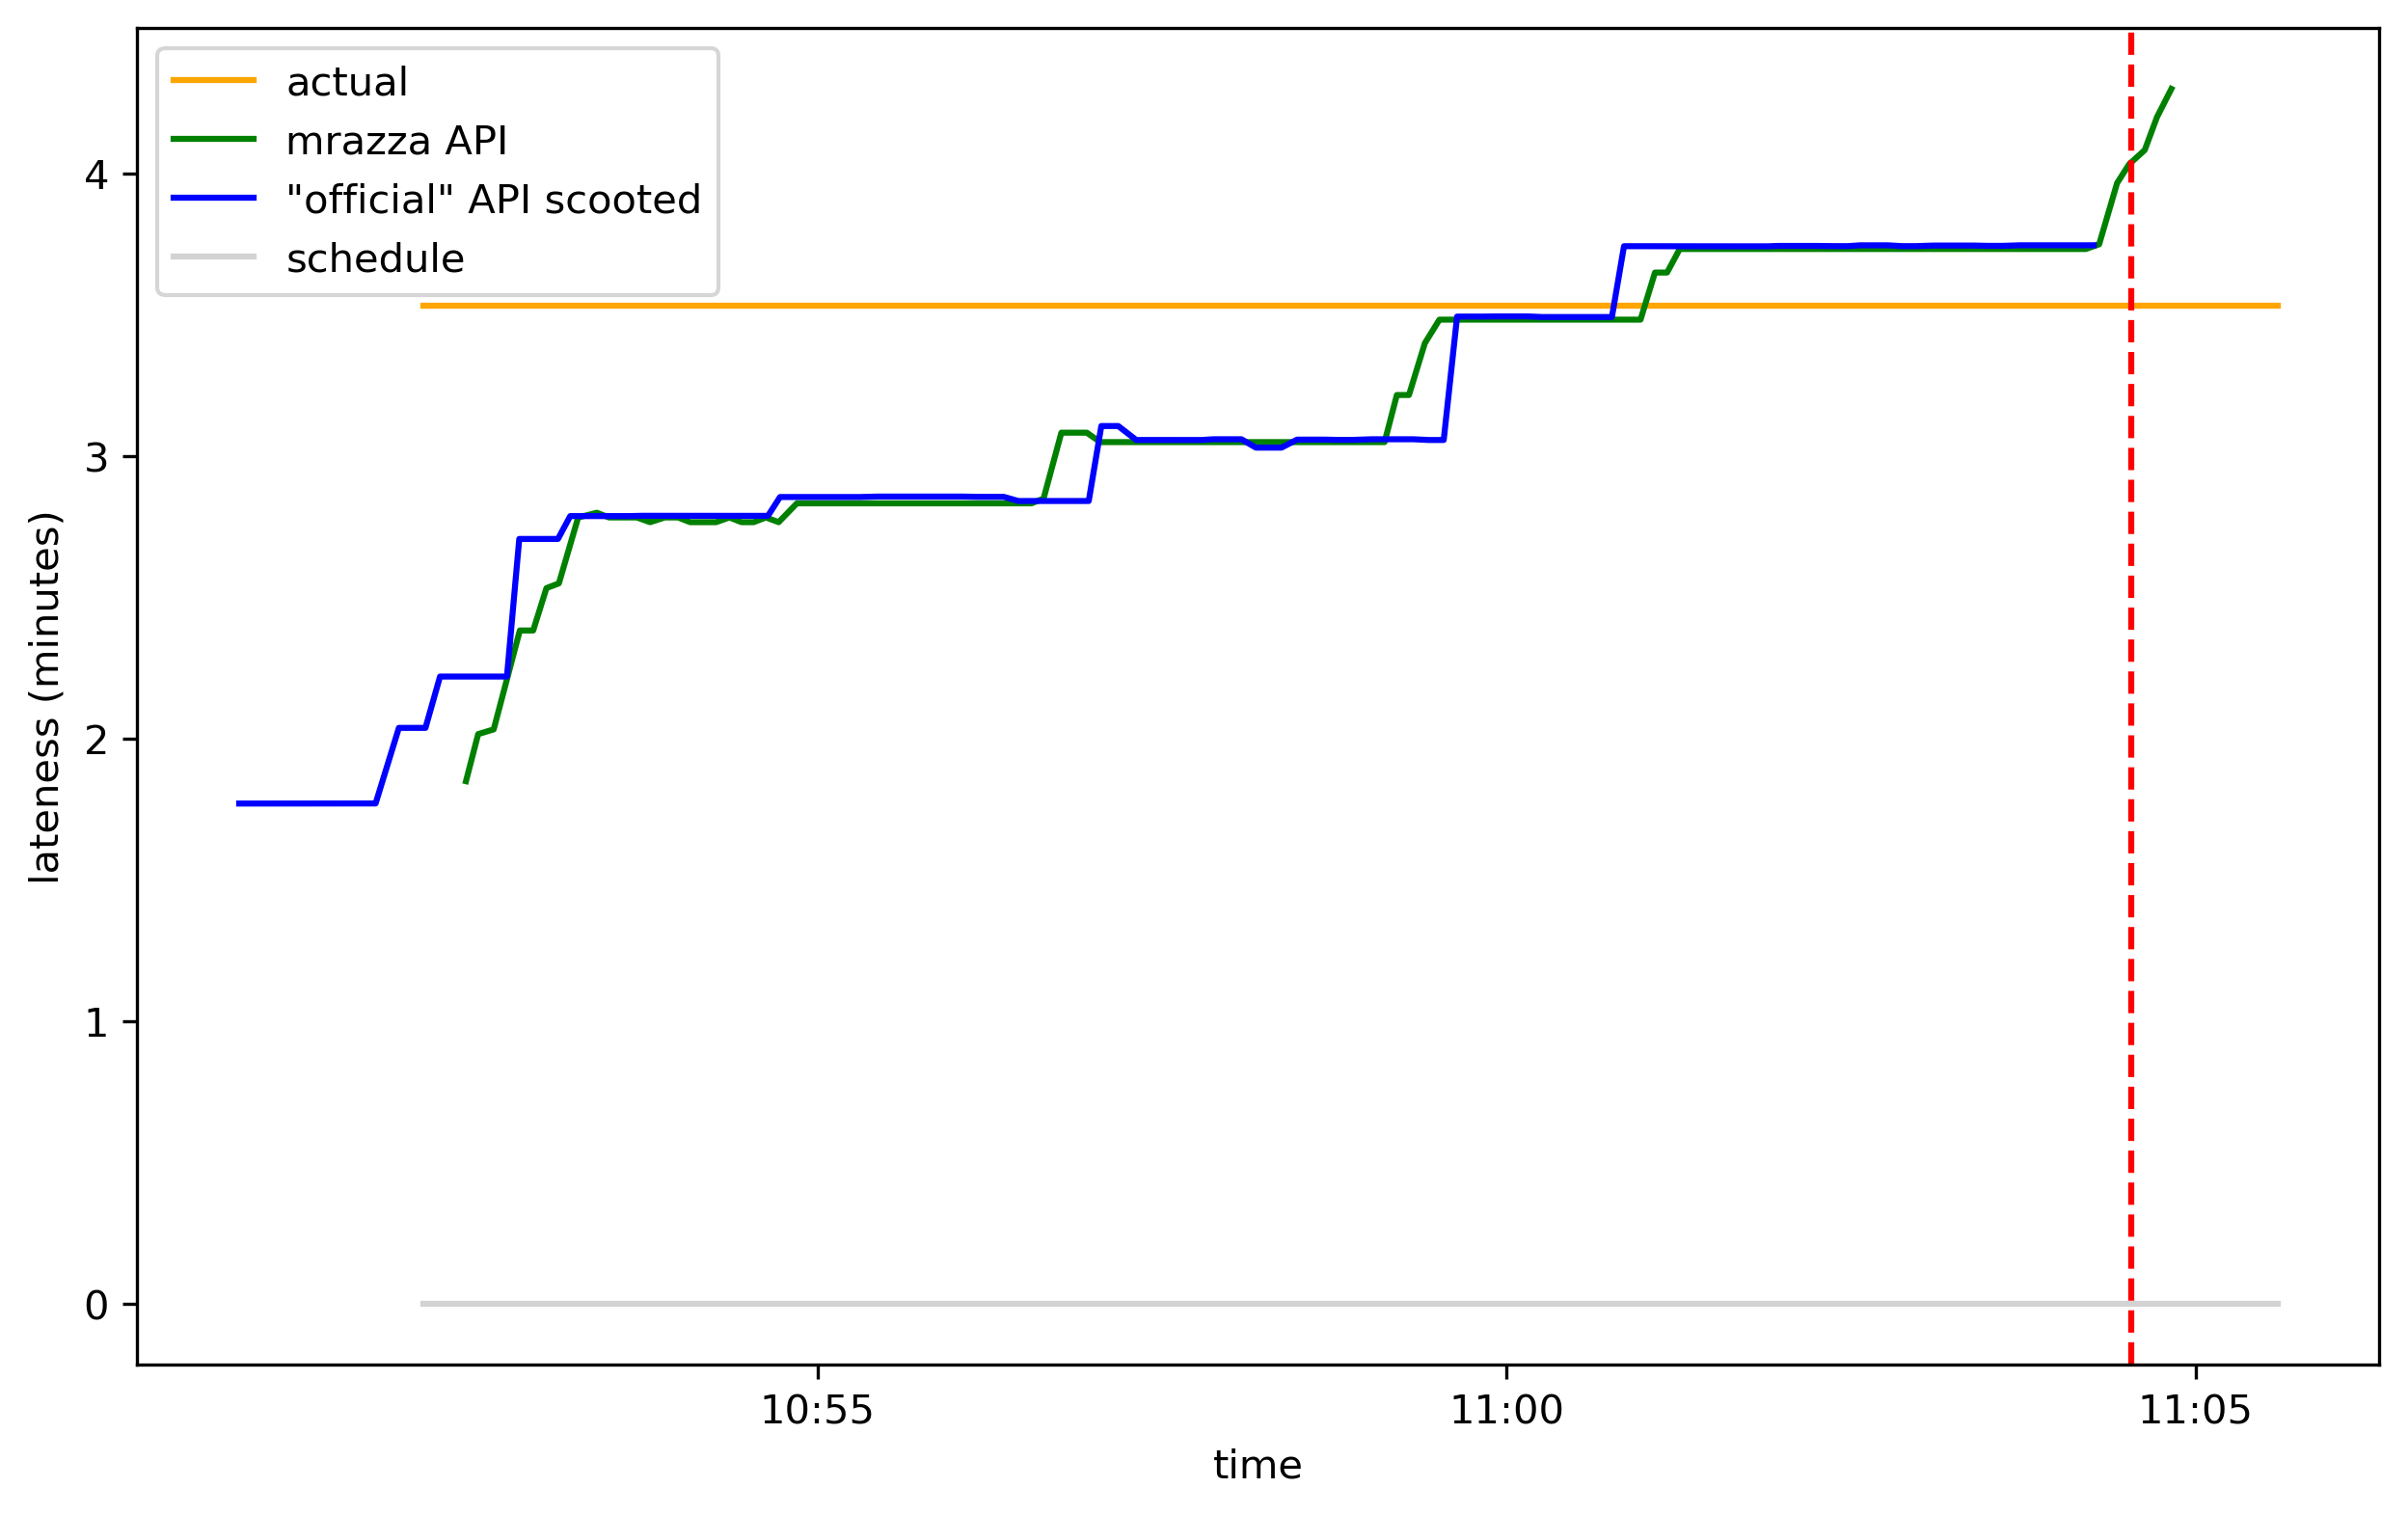
I hypothesize that the same data source feeds both the mrazza and “official” APIs (Matt’s blog post has more information about the data infra that PATH uses on the backend) and something in the “official” API adds a random delay of 70 to 90 seconds. So if you’re looking at the real-time departures on PATH’s website, the info you’re looking at is a little stale compared to what the backend actually knows.
That’s all for now,5 but maybe in a future episode I’ll revisit the data that we get from PATH’s API. The Jupyter notebook where I did this analysis is here. The scraper that recorded the data is here. To record the train departure time I used a simple Google Form (Google Forms records the timestamp when you submit a form).
There’s a 2-minute buffer baked into the 10 minute walk time, so I only waited an extra 2 minutes here.6 You maybe noticed that I waited 4 minutes but the API’s error only explained ~2 minutes. Can’t let a technicality interrupt my narrative flow. ↩
mrazza’s API is currently down so I hosted it locally to collect data, but my transit panel doesn’t use it. ↩
The “official” API is at https://www.panynj.gov/bin/portauthority/ridepath.json. I’m using scare quotes because I don’t think this API is meant for public consumption: it’s made for displaying realtime info on panynj.gov. It lacks an Access-Control-Allow-Origin: *
header and so I have to run a proxy on my Raspberry Pi in order to access it from my transit panel web app. ↩
Maybe the APIs use some other definition of “departure”? I think “the time the doors close” is the definition they should be using because it’s the most relevant to me as a rider, but maybe they use “the time the train starts moving”? ↩
Here’s a bonus graph, showing lateness like the 2nd graph but adding the magenta line. The magenta line has a slope of positive 1 in these transformed coordinates: ↩
I’ve probably spent more time working on the transit panel and blogging about it than it will ever save me, but eh, you have to find something to spend your time on. ↩
To make my life a little easier, I built a web app that runs on a tablet by my front door that tells me when I should leave my apartment to catch the next train. This is what it looks like:
I’ve been using it for 3 months and I’m really happy with it. It feels great to walk at a leisurely pace to the station and show up 2 minutes before the train leaves, every time. Instead of waiting in a cold station I can wait in my warm apartment.
2 minutes before departure, train waiting in station
The rest of this post will explain how I made this thing, which I call a transit panel. It wasn’t hard, and with a bit of HTML/Javascript knowledge and handiness you can make one of your own!
I used an Amazon Fire HD 10 tablet. This tablet is cheap ($150 at time of writing, but frequently on sale for $110 or less) and has a large-ish screen, which is important because I need to be able to read the screen from 10 meters away. The web app isn’t demanding and the system is always plugged in, so specs like processor and battery life don’t matter. The app runs full-time so the lockscreen ads aren’t an annoyance.
To mount it on the wall, I used the Dockem Koala Wall Mount 2.0, which worked well. It can be screwed to the wall or adhered using Command Strips; I chose to use these drywall anchors because Command Strips sometimes fall off after several months of use.
mount with tablet removed
I routed the power cable using these Monoprice cable clips.
The transit panel runs a simple web app without any frameworks. The source code is here, with most of the logic in main.js. I’m not a JS wizard; don’t judge my code 😅 (but constructive comments are appreciated! Send me a PR).
currently 3 transit options are supported
The app hard-codes schedules for the PATH and ferry (in departure_times.js). I wanted to use real-time data, but NY Waterway ferries don’t have real-time tracking at all, and the PATH has real-time information but they don’t have a Javascript-accessible web API (if you work at PATH, please implement this!).
Luckily, a true internet hero named Matthew Razza runs a web service that exposes the PATH data in a JSON HTTPS API. A second problem however is that the live PATH data doesn’t have a long enough time horizon. I take 10 minutes to walk to the station, and oftentimes the only departures returned by the API are less than 10 minutes in the future. (This affects everyone, including people using the official website and app—if you work at PATH, please fix this!).
I could combine the approaches, using the live API and falling back to the schedule if there is no data, but for now the hardcoded schedule works well enough.
I spent a ton of time trying to center the numbers vertically in their rows (e.g. the 4 in “leave in 4 min”). I would tweak the CSS to center it in Firefox, but then I would open it in Chrome on the same computer and it would look different, and the tablet would be different from both.
I thus learned the hard way that if you want your app’s text to have a consistent appearance across platforms, you need to use a font from a font service like Google Fonts instead of relying on the browser’s built-in font library.
It turns out that font geometry is complicated and compensating for different fonts in CSS/JavaScript to vertically center text is hard. The simplest solution is to use a consistent font and tweak the margins in CSS to make it look like you want.
I found the Luxon Javascript library really helpful for working with date/time values.
I used the Fennec browser from the F-Droid app store, which is a reskin of Firefox for Android. This was the only browser I found that behaved correctly when full-screened (hiding both the top and bottom system UI bars).
I’ve kept the tablet running continuously for about 4 months. Once or twice in that period, it’s gotten into a bad state and needed a reboot. I’ve noticed no issues with burn-in on the screen. I’m hoping to get several years of use before the hardware needs replacement.
At some point (maybe when it’s warmer) I’m planning to add a row showing bike availability at the nearest Citi Bike station. Citi Bike has a delightful and easy-to-use REST API. Speaking of weather, I’m also planning to add a row that shows the weather and current time.
Note: I’ve included some Amazon Affiliate links in this article, because eh, why not? I was going to link to Amazon anyway. If you click these links I may receive a commission at no cost to you, yadda yadda.
]]>This is a little optimistic. A year ago I could barely bumble through a basic conversation in Mandarin, and any sort of “real” Chinese text was totally inaccessible—I could only read things that were designed for language learners. Continuing to cram vocabulary didn’t seem to help. I couldn’t make it more than a sentence into a newspaper article or book without hitting an unfamiliar word and needing to pull out a dictionary.
This article is about some software I wrote, based on the Anki flashcard app, to help me leapfrog from HSK 4 to reading a real Chinese book. If you’re learning Chinese, you can download and use this software too! Fair warning, it’s still a lot of work. Chinese is hard.
The novel The Three Body Problem (三体 [Sān Tǐ] in Chinese) is moderately famous in sci-fi circles. The English translation won the 2015 Hugo Award for Best Novel and to date it is the only novel in translation to have done so. It’s one of Barack Obama’s favorite books. And Amazon was reported in May 2018 to be eyeing film rights to the book for $1 billion USD, in a bid to boost Amazon Prime Video’s original content (no word on whether that did happen).
One of my friends (hi Tommy!) recommended The Three Body Problem to me, and he also mentioned that the book reads a little more fluidly in the original Chinese. And so I decided to try reading the Chinese version. So far, I’m 45 pages in and actually kinda enjoying it. Which is a start, right?
I call the method I’m using to read the book “prestudy”. Here’s how it works:
With this technique you can read a page or so a day with moderate effort. The bottleneck is acquiring vocabulary; each page will generally have about 5-10 new words (starting from a HSK 4 base), and it’s difficult to memorize more than 5-10 new words per day. It gets gradually easier as you build up a vocabulary base and encounter fewer and fewer new words per page.
The technique also works pretty well for newspaper articles and TV shows (for shows, you’ll want to look for a .srt subtitles file).
This is not a totally new idea. It’s similar to many Chinese textbooks where each chapter presents a text passage and some related vocabulary. The difference is that you can make your own study guide, in the form of Anki flashcards, for anything you want to read.
The tool that does all this is an Anki add-on which you can get here. You copy/paste in your text (so you’ll need a PDF if it’s a book), enter your target vocabulary size, and select which deck and tags you want to apply to the cards:
It’s only compatible with the beta-channel Anki 2.1, not the stable-channel Anki 2.0. Sorry if this is a dealbreaker for you. I know some people are stuck on 2.0 because certain add-ons only support 2.0. If I have time and Anki 2.1 continues to be stuck in beta, I’ll look at making a 2.0-compatible version.
It also only supports texts with simplified characters. I’ll eventually add support for traditional characters. The silver lining is that when you add a flashcard for a simplified character, you’ll also get a flashcard for the traditional character. It’ll be suspended by default so you’ll have to unsuspend if you want to study it.
All the code behind this is open-source, and it’s split across several components that can be re-used in other projects:
With the exception of genanki, none of these projects is in a very contributor-friendly state. Most of their code isn’t very readable or documented and could use more unit tests. Still, I’d encourage interested persons to dive in and make contributions; I’ll try my best to help you out and make the code more hackable as we go.
This project also leans heavily on a lot of great open-source projects:
Learning this way still demands a lot of perseverence, bordering on masochism, but that’s Chinese. On the bright side, I feel like I’m developing proficiency faster than any point other than when I was in undergrad taking Chinese classes 5 days a week.
Reading better has also lifted my listening and speaking abilities, even though I haven’t spent much time on those recently.
I still have to stop and look up a word every 3 or 4 sentences, which is a pain. I usually use the OCR feature in the Hanping Chinese Camera app, and on an unsteady train (where I normally read) this gets frustrating fast. I’m working on a solution for this too: a “cheatsheet” that lists all the advanced words so you don’t have to study them with flashcards. But it’s not done yet.
I hope that you find this tool useful on your Chinese learning journey! Feel free to leave feedback on GitHub’s issue tracker or by mail to k@kerrickstaley.com. Upvotes on Hacker News are also appreciated!
]]>I wanted to get a transcript of the episode’s dialog so I could study the unfamiliar vocabulary. Unfortunately, the video files I have only have hard subtitles, i.e. the subtitles are images directly composited into the video stream. After an hour spent scouring both the English- and Chinese- language webs, I couldn’t find any soft subs (e.g. SRT format) for the show.
So I thought it’d be interesting to try to convert the hard subs in the video files to text. For example, here’s a frame of the video:
From this frame, we want to extract the text “怎么去这么远的地方“. To approach this, we’re going to use the Tesseract library and the PyOCR binding for it.
We could just try throwing Tesseract at it and see what comes out:
Running it:
Hmm, so that didn’t work. What’s happening?
Tesseract requires that you clean your input image before you do OCR. Our input image is full of irrelevant background features but Tesseract expects clean black text on a white background (or white on black).
To remove the background image and get just the subtitles, we turn to OpenCV. The easiest part is cropping the image. We keep a larger left/right border because some frames have more text:
The result:
Now we want to isolate the text. The text is white, so we can mask out all the areas in the image that aren’t white:
This uses the OpenCV inRange
function. inRange
returns a value of 255 (pure white in an 8-bit grayscale context) for pixels where the red, blue, and green components are all between 200 and 255, and 0 (black) for pixels that are outside this range. This is called thresholding. Here’s what we get:
A lot better! Let’s run Tesseract again:
And Tesseract returns (drumroll…):
Now we’re getting somewhere! Several areas in the background are white, so when we pass those through to Tesseract it interprets them as assorted punctuation. Let’s strip out these non-Chinese characters using the built-in Python unicodedata library:
The 'Lo'
here is one of the General Categories that Unicode assigns to characters and stands for “Letter, other”. It’s good for extracting East Asian characters. From this code we get:
There are two mistakes here: a spurious 二 character on the front, and a mismatched character in the middle (that 逯 should be 这). Still, not bad!
That’s all for now, but in Part 2 (and maybe Part 3?) of this post series I’ll discuss how we can use some more advanced techniques to perfect the above example and also handle cases where extracting the text isn’t so straightforward. If you can’t wait until then, the code is on GitHub.
If you have any comments about this post, join the discussion on Hacker News, and if you enjoyed it, please upvote on HN!
]]>
When you click the canvas, a colored square will appear. The square is 200 x 200 pixels unless there is another square (or the canvas border) in the way. Here are a few designs I’ve made with this:
One of the challenges here was deciding how to represent the squares’ positions, so that I can quickly check whether a new square will “bump” another. I use both an array of Widget
objects with row
, col
, width
, and height
properties, and a 480 x 640 array, where each element points to a Widget
(or is null
). When expanding a new square, I update both arrays. As an added wrinkle, the 2D array is actually 4 arrays: one for each rotation of the canvas. This meams I can use the same code to expand a new square in different directions.
You can check out the full source code for this demo on GitHub.
]]>